Best Basic Sourdough Bread Recipe
There is no getting around it, sourdough bread making is very popular right now. Funny thing is, it has always been popular but now with social media it’s just more talked about. If you are new to sourdough, or been making it a while, here is my favorite loaf and the best basic sourdough bread recipe you will ever find and make. It’s basically dummy proof (or at least I think it is).
Sourdough is not complicated and should not be something you run from or over think. There are very few ingredients and the instructions are pretty straight forward. Not to mention, if you follow me on my social accounts I’ve shared a few times the whole process, so just look for those videos if you need.
What is Sourdough
To be fun I asked ChatGPT what sourdough is, and here is what it said. “Sourdough is a type of bread made through a natural fermentation process using a sourdough starter — a culture of flour and water populated by wild yeast and lactic acid bacteria. Unlike bread made with commercial yeast, sourdough rises slowly and develops a tangy, complex flavor.”
I figured ChatGPT could explain better than I could. I just tell people it’s the best bread you can eat because you know what’s in it.
It’s time to grab your sourdough starter and make a loaf, or two. Using the best basic sourdough bread recipe you will ever find. As I said, this is a basic recipe and if followed is pretty fool proof.
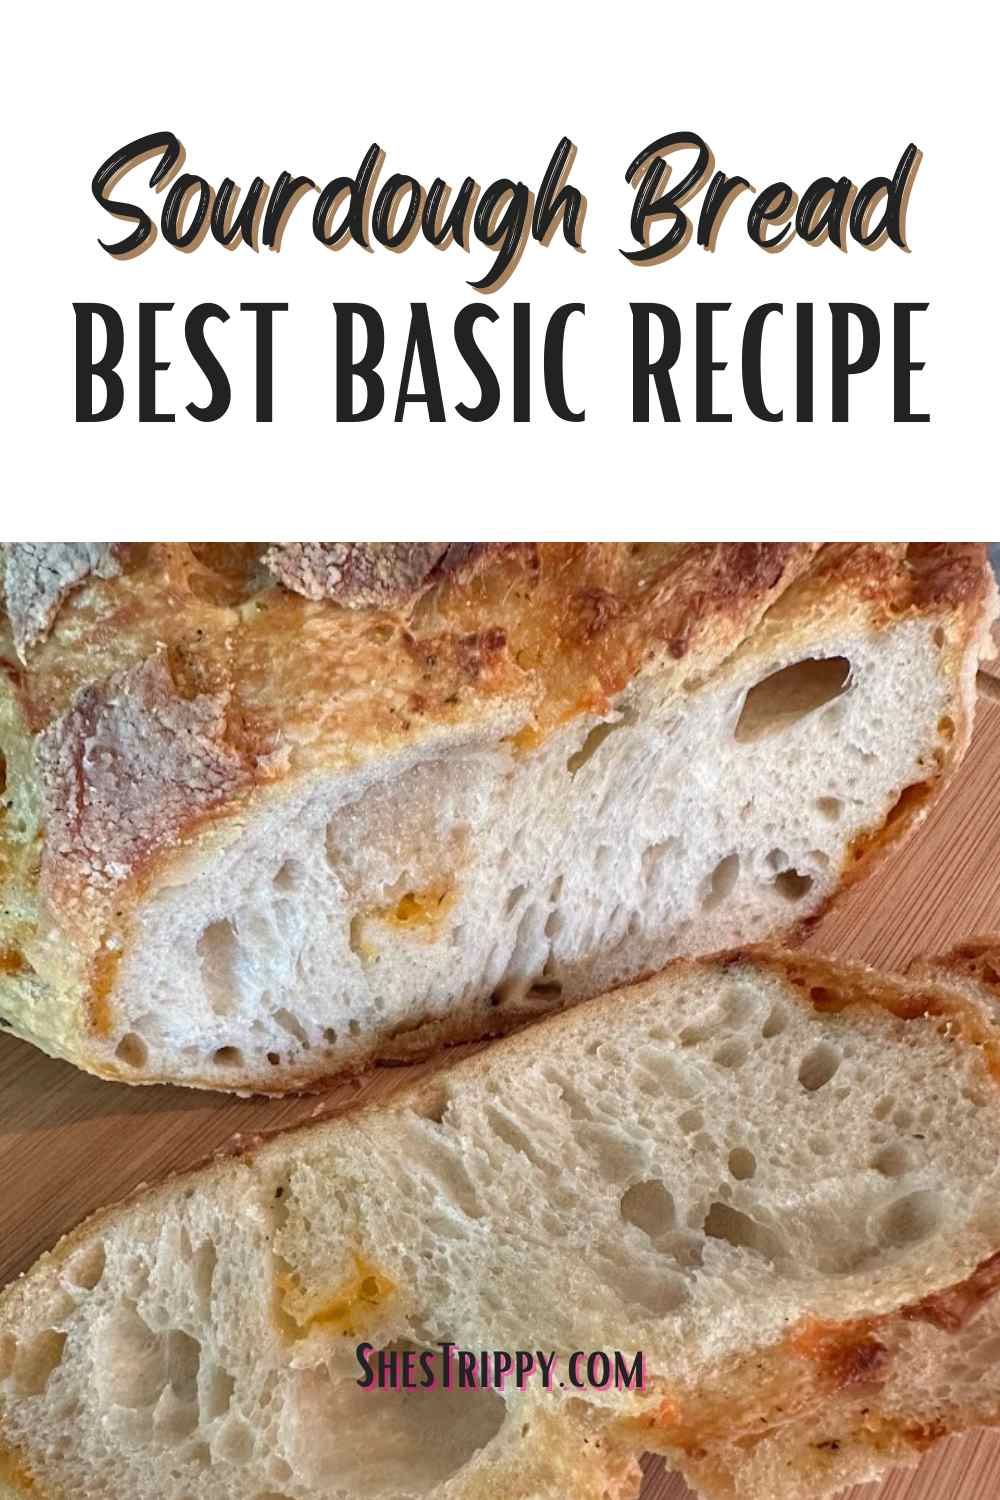
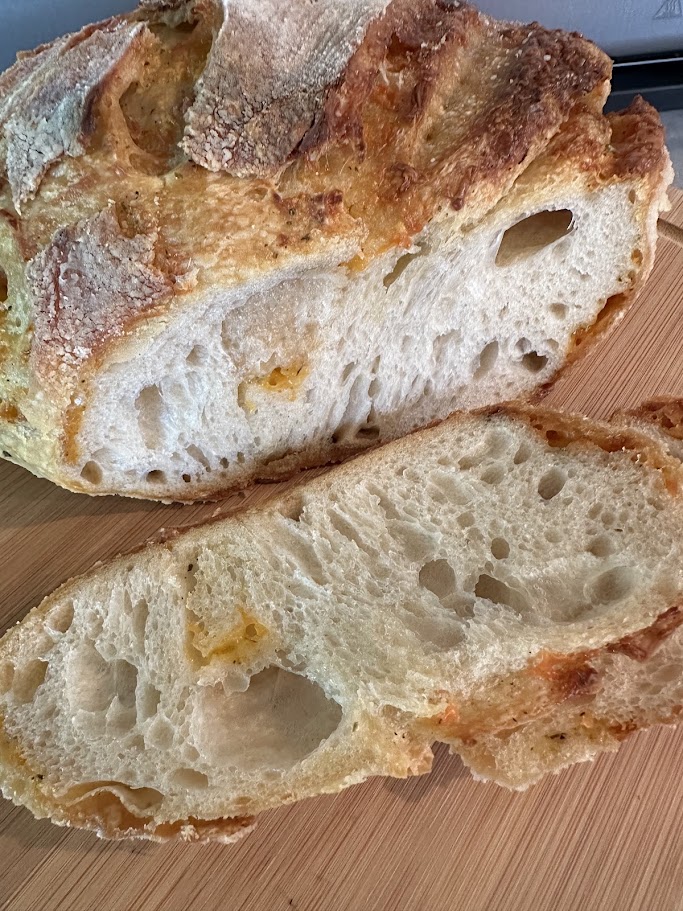
If you are wondering what the little orangish spot in the bread in the image above is, it’s cheese. I added cheese to that loaf and it’s the only one I have a crumb shot picture of.
Do you have sourdough starter? If not, you can order some here from Pauline Manor. This is where I got my starter from and it’s been amazing and never failed me.
Wondering how to keep and feed your starter? Here is a video of me feeding my starter. If the video below doesn’t work you can find it on my personal Facebook page.
Best Basic Sourdough Bread Recipe
When you have a great active starter it’s time to start making great recipes. This is one of the best. Simple and basic doesn’t mean it’s boring or bad. Why break something that isn’t broken? This is a tried and true recipe used all over the world. Instead of searching for those quick shortcuts, just stick to the basics and your bread will be perfect.
Ingredients
- 475-500 grams bread flour
- 325-375 grams warm water
- 100 grams active starter
- 10 grams salt
Time to make the Bread – Instructions
Feed your sourdough starter the evening before. You want to start this bread in the morning so it has all day to rise. I feed my starter between 5-6pm generally.
Start this in the morning using these instructions.
- In a mixing bowl combine warm water and active starter.
- Mix well with bread whisk
- Slowly start adding in flour and mixing well. I add 100 grams at a time.
- Once you have added 300 grams of the flour, add your salt and mix well.
- Add remaining flour to equal 475-500 grams. You can gauge this by how shaggy the dough is. (see below notes)
- Cover the bowl with a wet towel or one of these very useful shower caps.
- Leave dough alone for 30 min.
Time to Play with the Dough – Stretch and Folds
People often over think this process. I hear all the time that they find quick and easy recipes online that don’t require stretch and folds. Let me just say, while those recipes can turn out great, you are missing the real sourdough process. Stretch and folds build the gluten and give the bread the sourdough toughness and taste. Don’t skip these steps.
- Uncover your bowl and start with a damp hand. Grab one edge of the dough and pull up, stretching as you pull. Pull it up, and place it back down on top of the dough, towards the middle.
- Repeat that step 3 more times. So, think of it as your dough ball has 4 sides and you need to stretch and fold each side.
- Cover the bowl again and wait another 30 min.
- Repeat these steps until you have completed 3 rounds of stretch and folds.
- Cover bowl, set in a warm place to bulk ferment for 6-12 hours or until double.
It’s Shaping Time
- Once your dough has doubled (don’t let it over ferment) it’s time to shape it.
- Dump the dough out on a very lightly flours surface. Your dough should release from the bowl without much effort.
- Holding the bowl upside down and tilted slightly, let it just fall out. You can also use a dough scraper to help.
- When the dough is on the counter, laminate it. That means, stretch it out into a rectangle and then fold in the 2 sides and roll into a ball.
- To shape the ball your gently turn it and pull it towards you. The surface should be free of flour at this point. The reason being is that you want the dough a bit sticky, so it can pull and stick together.
- When the ball is nice and taught, let it sit on the counter for 10-15 min to rest.
- Grab your banneton and lightly flour it. After the dough sits a bit, take the dough scraper under the dough and flip it upside down into the banneton.
- Pinch together the dough if it splits open. This helps to keep tension on the dough.
- Place a cover on the banneton and place into the fridge overnight. Usually I do my shaping before bed, so about 6-7 pm and place it in the fridge til morning.
Time to Bake the Bread
Many people think you have to use a dutch oven for baking sourdough. While that is a great thing to use, you don’t have to use one. Lodge Cast Iron has my favorite dutch ovens if you are in the market for one.
You can use any type of pan you have.
If you are using a cast iron or dutch oven you do need to preheat it in the oven. If so, set your oven to 500 degrees and place your dutch oven inside. Preheat for 1 hour.
If you are using a regular baking pan, just preheat the oven to 500 degrees for 30 min.
- Take the dough out of the fridge when the oven is ready.
- Dump the dough out on parchment paper or a silicone sling.
- Dust the top of the dough with a little bread flour or rice flour.
- Score the bread. Basically make some pretty cuts on tip or a big X on the top.
- Make sure you have only the bottom rack in your oven.
- If you preheated a dutch oven, take it from the oven, take the lid off and place the dough inside.
- Place the lid back on and place into the oven.
- If you are using a regular pan, just place the dough in the pan and put the lid on and into the oven.
- Turn the oven to 475 and bake with the lid on for 30 min.
- Remove the lid, turn the oven to 425 and bake another 20-30 min or until the internal temp is 205 and the crust is a golden brown.
- Remove the pan from the oven, and remove the bread from the pan right away and place on a wire rack to cool.
- Let the bread cool for at least 30 min before cutting into it. If you cut to quick the bread inside will still be doughy.
Notes
The consistency of the “shaggy” dough means it’s sticky, but not wet and sloppy. If you are using your hands for the final mix it will stick to your hands, but still be a bit dry. So, basically not like glue.
Everyone’s house is different which means things will rise (bulk ferment) at a different rate. If your house is a consistent 68-70 degrees your dough will rise perfect on your counter. If your house is cooler you can place the dough on your stove with the light under the microwave on low. Or even in the microwave with the light on low.
Here is a great video of me prepping some dough.
Best Basic Sourdough Bread Recipe
If you are looking for an easy and perfect recipe for a basic sourdough loaf, this is your lucky day. Here is the best basic sourdough loaf recipe you will ever find.
Ingredients
- 475-500 grams bread flour
- 325-375 grams warm water
- 100 grams active starter
- 10 grams salt
Instructions
Feed your sourdough starter the evening before. You want to start this bread in the morning so it has all day to rise. I feed my starter between 5-6pm generally.
- In a mixing bowl combine warm water and active starter.
- Mix well with bread whisk
- Slowly start adding in flour and mixing well. I add 100 grams at a time.
- Once you have added 300 grams of the flour, add your salt and mix well.
- Add remaining flour to equal 475-500 grams. You can gauge this by how shaggy the dough is. (see below notes)
- Cover the bowl with a wet towel or one of these very useful shower caps.
- Leave dough alone for 30 min.
- Uncover your bowl and start with a damp hand. Grab one edge of the dough and pull up, stretching as you pull. Pull it up, and place it back down on top of the dough, towards the middle.
- Repeat that step 3 more times. So, think of it as your dough ball has 4 sides and you need to stretch and fold each side.
- Cover the bowl again and wait another 30 min.
- Repeat these steps until you have completed 3 rounds of stretch and folds.
- Cover bowl, set in a warm place to bulk ferment for 6-12 hours or until double.
- Once your dough has doubled (don't let it over ferment) it's time to shape it.
- Dump the dough out on a very lightly flours surface. Your dough should release from the bowl without much effort.
- Holding the bowl upside down and tilted slightly, let it just fall out. You can also use a dough scraper to help.
- When the dough is on the counter, laminate it. That means, stretch it out into a rectangle and then fold in the 2 sides and roll into a ball.
- To shape the ball your gently turn it and pull it towards you. The surface should be free of flour at this point. The reason being is that you want the dough a bit sticky, so it can pull and stick together.
- When the ball is nice and taught, let it sit on the counter for 10-15 min to rest.
- Grab your banneton and lightly flour it. After the dough sits a bit, take the dough scraper under the dough and flip it upside down into the banneton.
- Pinch together the dough if it splits open. This helps to keep tension on the dough.
- Place a cover on the banneton and place into the fridge overnight. Usually I do my shaping before bed, so about 6-7 pm and place it in the fridge til morning.
Time to Bake the Bread
Many people think you have to use a dutch oven for baking sourdough. While that is a great thing to use, you don't have to use one. Lodge Cast Iron has my favorite dutch ovens if you are in the market for one.
You can use any type of pan you have.
If you are using a cast iron or dutch oven you do need to preheat it in the oven. If so, set your oven to 500 degrees and place your dutch oven inside. Preheat for 1 hour.
- Take the dough out of the fridge when the oven is ready.
- Dump the dough out on parchment paper or a silicone sling.
- Dust the top of the dough with a little bread flour or rice flour.
- Score the bread. Basically make some pretty cuts on tip or a big X on the top.
- Make sure you have only the bottom rack in your oven.
- If you preheated a dutch oven, take it from the oven, take the lid off and place the dough inside.
- Place the lid back on and place into the oven.
- If you are using a regular pan, just place the dough in the pan and put the lid on and into the oven.
- Turn the oven to 475 and bake with the lid on for 30 min.
- Remove the lid, turn the oven to 425 and bake another 20-30 min or until the internal temp is 205 and the crust is a golden brown.
- Remove the pan from the oven, and remove the bread from the pan right away and place on a wire rack to cool.
- Let the bread cool for at least 30 min before cutting into it. If you cut to quick the bread inside will still be doughy.
Notes
The consistency of the "shaggy" dough means it's sticky, but not wet and sloppy. If you are using your hands for the final mix it will stick to your hands, but still be a bit dry. So, basically not like glue.
Everyone's house is different which means things will rise (bulk ferment) at a different rate. If your house is a consistent 68-70 degrees your dough will rise perfect on your counter. If your house is cooler you can place the dough on your stove with the light under the microwave on low. Or even in the microwave with the light on low.
The image used for the recipe is one I took of the crumb shot of a loaf I added cheese too, so that’s what the orange spot is.